
Steel cables serve countless purposes in construction, marine applications, agriculture, and home projects. Whether you’re building a deck railing, creating a cable fence, or securing equipment, knowing how to properly fasten these cables is essential. This comprehensive guide will walk you through everything you need to know about securing steel cables using clamps with screws.
Understanding Steel Cable Basics
Steel cables consist of multiple wire strands twisted together to create strength and flexibility. They come in various diameters and configurations, each suited for different applications. The right fastening method ensures your project remains safe and durable for years to come.
Before selecting your fastening hardware, you need to understand the cable’s load requirements. Different projects demand different weight capacities. A decorative garden trellis requires less strength than a heavy-duty rigging system. Therefore, matching your hardware to your specific needs prevents future failures.
Why Proper Fastening Matters
Incorrect cable securing can lead to serious consequences. Loose connections may cause structural failure, safety hazards, or equipment damage. Additionally, poor installation techniques can damage the cable itself, reducing its load-bearing capacity. Taking time to learn proper methods saves money and prevents accidents.
The environment also plays a crucial role in fastening longevity. Outdoor installations face weather challenges that indoor projects don’t encounter. Moisture, temperature changes, and exposure to elements all affect hardware performance over time.
Types of Cable Clamps Available
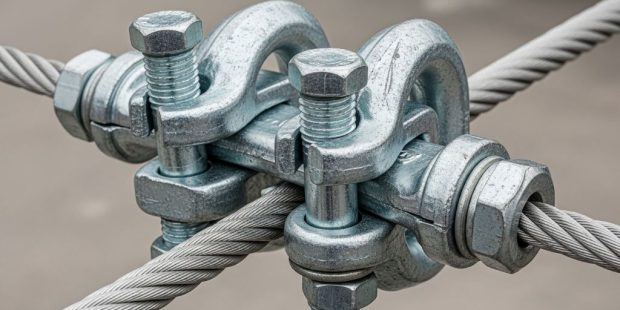
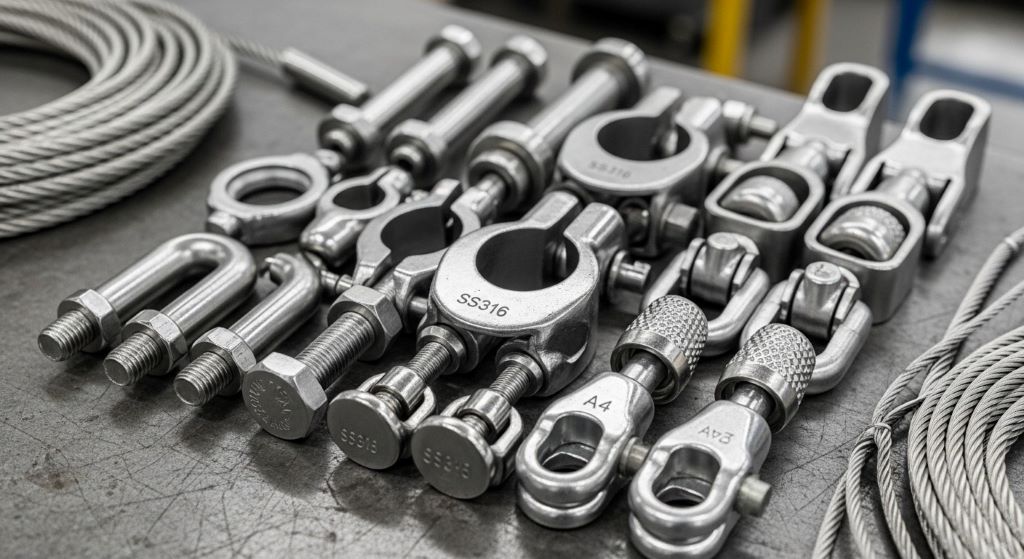
Several clamp styles exist for securing steel cables. U-bolt clamps feature a U-shaped bolt that wraps around the cable with a saddle plate on top. These provide strong holding power and work well for most applications. Wire rope clips function similarly but come in different configurations for specific needs.
Simplex clamps offer a one-piece design that simplifies installation. They work well for lighter applications where maximum strength isn’t critical. However, they may not provide enough grip for heavy-duty projects.
Duplex clamps provide enhanced gripping power through their double-saddle design. These excel in situations requiring extra security. They cost more than basic options but deliver superior performance.
Choosing Steel Cable Fasteners for Your Project
Selecting appropriate steel cable fasteners involves considering several factors. First, evaluate the cable diameter you’re working with. Clamps must match the cable size precisely to function correctly. Using oversized or undersized hardware compromises the connection’s integrity.
Next, consider the working load limit required for your application. Each clamp type has specific load ratings. Exceeding these ratings risks catastrophic failure. Always build in a safety margin by choosing hardware rated well above your expected loads.
The installation environment significantly impacts fastener selection. Indoor projects in climate-controlled spaces have different requirements than outdoor installations. Marine environments present particularly harsh conditions that demand specialized solutions.
The Importance of Corrosion Resistant Clamps
Rust and corrosion destroy metal hardware over time. Standard steel clamps deteriorate quickly when exposed to moisture, salt, or chemicals. This degradation weakens connections and eventually causes failure. Therefore, using corrosion resistant clamps extends your installation’s lifespan dramatically.
Stainless steel clamps offer excellent protection against rust and corrosion. They withstand harsh weather, saltwater exposure, and chemical environments. While more expensive initially, they save money by eliminating frequent replacements.
Galvanized clamps provide another option for corrosion protection. The zinc coating shields the underlying steel from moisture and oxygen. These work well in moderately harsh environments and cost less than stainless steel alternatives.
Marine-grade hardware represents the premium choice for extreme conditions. These specialized fasteners resist even the harshest saltwater environments. Boat owners and coastal property managers rely on them for critical applications.
Essential Tools and Materials Needed
Gathering the right tools before starting ensures smooth installation. You’ll need an adjustable wrench or socket set matching your clamp’s bolt sizes. A torque wrench helps apply proper tightening force without overdoing it.
Cable cutters designed for steel wire make clean cuts without fraying. Regular wire cutters won’t work effectively on steel cables. Additionally, heavy-duty work gloves protect your hands from sharp wire ends.
A measuring tape ensures accurate cable lengths and proper spacing between clamps. Some installations require multiple clamps along a single cable run. Consistent spacing maintains uniform strength distribution.
Safety glasses protect your eyes from metal fragments during cutting and installation. Steel cable ends can spring back unexpectedly, creating hazards. Never skip this important safety equipment.
Step-by-Step Installation Process
Start by cutting your cable to the required length. Add extra material for creating loops or terminations. Clean cuts prevent fraying that weakens the cable and complicates installation.
Create a loop at the cable end by bending it back on itself. The loop size depends on your application needs. Larger loops accommodate thicker hardware or provide more connection options.
Position the first clamp approximately one cable diameter away from the loop’s end. This placement provides optimal grip without damaging the cable. Slide the U-bolt around both cable sections with the saddle plate on top of the working end.
Thread the nuts onto the U-bolt finger-tight initially. Don’t fully tighten yet, as you’ll need to make adjustments. Ensure the saddle plate sits firmly against the working cable end, not the standing part.
Add the second clamp about six cable diameters away from the first one. This spacing distributes stress effectively and prevents slippage. Position it with the saddle plate on the same side as the first clamp.
Now begin tightening the clamps alternately. Turn each nut a few turns, then switch to the other clamp. This alternating pattern ensures even pressure distribution. Continue until both clamps feel snug but not fully tight.
Use your torque wrench to apply the manufacturer’s recommended tightening specification. Over-tightening crushes the cable and reduces its strength. Under-tightening allows slippage and connection failure. Following specifications ensures optimal performance.
After initial tightening, some applications require a load test. Apply tension to the cable and observe the connection behavior. Look for any slippage or movement that indicates improper installation.
Many professionals recommend adding a third clamp for critical applications. Position it between the first two clamps for additional security. This extra fastener provides redundancy that enhances safety.
Common Installation Mistakes to Avoid
Never install clamps backwards with the saddle plate on the standing cable portion. This configuration crushes the load-bearing cable and weakens the entire system. Always place saddles on the working end only.
Using too few clamps represents another frequent error. Single-clamp installations rarely provide adequate security. Most applications require at least two clamps, with three being preferable for important projects.
Mismatched hardware sizes cause problems even with correct installation techniques. Double-check that clamp specifications match your cable diameter exactly. Small discrepancies lead to poor grip and eventual failure.
Neglecting regular inspections allows problems to develop unnoticed. Check your installations periodically for signs of wear, corrosion, or loosening. Catching issues early prevents accidents and expensive repairs.
Maintaining Your Cable Connections
Regular maintenance extends the life of your cable systems. Inspect clamps monthly for visible damage, rust, or loosening. Tighten any connections that show movement or play.
Clean hardware periodically to remove dirt, salt, and debris. These contaminants accelerate corrosion even on protected materials. A simple wipe-down with a clean cloth makes a significant difference.
Apply appropriate lubricants to threads and moving parts. This prevents seizing and makes future adjustments easier. However, avoid getting lubricant on the cable itself, as this attracts dirt.
Replace any hardware showing significant corrosion, deformation, or cracking. Attempting to reuse damaged components risks sudden failure. The cost of new hardware far outweighs the risk of accidents.
Special Considerations for Different Applications
Marine environments demand extra attention to material selection. Saltwater accelerates corrosion dramatically compared to freshwater or terrestrial settings. Invest in the highest quality marine-grade hardware for boats and coastal structures.
Agricultural uses often involve chemical exposure from fertilizers and pesticides. These substances attack standard hardware aggressively. Choose chemical-resistant materials appropriate for your specific agricultural application.
Architectural cable railing systems require precise tension and alignment. Inconsistent installations create safety hazards and aesthetic problems. Consider hiring professionals for complex architectural projects.
Industrial rigging applications may involve dynamic loads and vibration. These conditions stress connections differently than static installations. Specialized hardware designed for dynamic loads ensures reliability in industrial settings.
Cost Considerations and Value
Premium hardware costs more upfront but delivers better long-term value. Cheap clamps require frequent replacement and create safety risks. Calculate total cost of ownership rather than just initial purchase price.
Buying in bulk reduces per-unit costs for large projects. However, ensure you’re purchasing the correct specifications before ordering quantity. Returns and exchanges complicate bulk purchases.
Factor installation labor into your budget planning. Proper installation takes time but prevents expensive callbacks and repairs. Rushing through installations to save time often costs more in the long run.
Safety Guidelines and Best Practices
Always work within your skill level and knowledge. Complex installations may require professional assistance. Recognizing when to call experts prevents dangerous mistakes.
Test installations before putting them into service. Apply gradual loads while monitoring for movement or failure. This testing identifies problems before they cause accidents.
Keep detailed records of your installations, including dates, materials used, and maintenance performed. This documentation helps track performance and schedule future maintenance.
Follow all applicable building codes and regulations for your area. These rules exist to ensure safety and proper construction practices. Violations can result in fines and liability issues.
Conclusion
Securing steel cables with clamps and screws requires attention to detail and proper technique. Understanding the different types of steel cable fasteners available helps you select appropriate hardware for your specific needs. Additionally, choosing corrosion resistant clamps ensures long-lasting performance in challenging environments.
Proper installation involves careful positioning, correct tightening procedures, and using adequate numbers of clamps. Avoiding common mistakes prevents failures and safety hazards. Regular maintenance and inspections keep your installations functioning reliably for years.
Whether you’re working on a home project or industrial application, following these guidelines produces secure, durable cable connections. Investing in quality materials and taking time for proper installation pays dividends through enhanced safety and longevity.
Frequently Asked Questions
How many clamps do I need for a single cable connection?
Most applications require at least two clamps per connection, with three being recommended for critical installations. The exact number depends on cable diameter, load requirements, and safety factors. Heavier loads and larger cables typically need more clamps for adequate security.
Can I reuse cable clamps after removing them?
Reusing clamps is generally not recommended because threads and components wear during initial installation. The clamping force may be compromised, leading to connection failure. However, if clamps show no visible damage and haven’t been over-tightened, careful reuse might be acceptable for non-critical applications.
What’s the difference between galvanized and stainless steel clamps?
Galvanized clamps feature a zinc coating over regular steel, providing moderate corrosion protection at lower cost. Stainless steel clamps offer superior corrosion resistance, especially in marine and highly corrosive environments. Stainless steel costs more but lasts significantly longer in harsh conditions.
How tight should I make the clamp bolts?
Follow the manufacturer’s torque specifications, typically ranging from 15 to 45 foot-pounds depending on clamp size. Over-tightening crushes the cable and reduces strength, while under-tightening allows slippage. Using a torque wrench ensures proper tightening without guesswork.
How often should I inspect cable clamp connections?
Inspect connections monthly for the first year, then quarterly if no issues appear. However, increase inspection frequency for critical applications, harsh environments, or systems experiencing heavy use. Look for loosening, corrosion, cable damage, or any signs of movement at connection points.
Related Topics:
The Unique Challenges of Using Ropes in Underwater Construction
What Are the Benefits of Skipping a Rope?