
Large flower pot make a dramatic statement in any garden, patio, or entryway. They offer a fantastic opportunity to create lush, eye-catching arrangements that smaller large flower pot simply can’t match. However, their size presents unique challenges. Filling a cavernous container entirely with potting mix can be incredibly heavy, expensive, and might not even be the best approach for your plants’ health. Don’t let that intimidate you! With a few clever tricks and the right knowledge, you can successfully fill those grand planters without breaking your back or your budget. This guide will walk you through everything you need to know, from choosing the right pot and fillers to ensuring your plants thrive.
Why Do large flower pot Need Special Attention?
Before diving into the “how-to,” let’s understand why large large flower pot require a different approach than their smaller cousins. The sheer volume is the primary factor. Filling a 24-inch or larger pot entirely with high-quality potting mix means using multiple large bags, which quickly adds up in cost. Secondly, that much soil, especially when wet, becomes extraordinarily heavy. If you ever plan on moving the pot, even slightly, this weight becomes a significant obstacle. Lastly, proper drainage and aeration can be harder to manage in deep containers. Too much dense, waterlogged soil at the bottom can lead to root rot, a common plant killer. Therefore, strategically filling the lower portion of the pot addresses weight, cost, and drainage concerns simultaneously.
Choosing the Right Pot: Material Matters
Your journey starts with selecting the perfect large pot. Consider the material, as it impacts weight, durability, and how quickly the soil dries out.
- Terracotta: Classic and beautiful, but porous, heavy, and prone to cracking in freezing temperatures. Soil dries out faster.
- Glazed Ceramic: Offers beautiful finishes and retains moisture better than terracotta, but can still be very heavy and susceptible to frost damage.
- Plastic/Resin: Lightweight, affordable, durable, and excellent at retaining moisture. Available in many styles mimicking other materials. Ensure they are UV-resistant to prevent fading and brittleness.
- Fiberglass: Lightweight like plastic but often more durable and with higher-end finishes. A good balance of aesthetics and practicality.
- Concrete: Extremely durable and stable, but also exceptionally heavy and best for permanent placements.
- Wood: Offers a natural look but can decay over time unless properly treated or lined. Weight varies depending on the wood type.
Crucially, ensure your chosen pot has drainage holes. This is non-negotiable for plant health. If a decorative pot lacks holes, you can sometimes drill them yourself (carefully!) or use the “double potting” technique: plant in a slightly smaller plastic pot with drainage holes and place it inside the decorative one, using fillers or gravel in the outer pot to raise the inner one if needed.
The Great Filler Debate: What Goes in the Bottom?
Here’s where the magic happens! Instead of filling the entire pot depth with expensive soil, use lightweight, space-occupying materials in the bottom third or half, depending on the depth needed for your plants’ roots. Research your chosen plants to understand their root depth requirements – shallow-rooted annuals need less soil depth than shrubs or small trees.
Lightweight Filler Options (Pros & Cons):
- Plastic Bottles/Jugs: (Empty, tightly capped water bottles, soda bottles, milk jugs – avoid chemical containers).
- Pros: Very lightweight, readily available, free (recycling!), creates large air pockets. Tightly capped bottles prevent water stagnation inside.
- Cons: Soil can settle into gaps over time (mitigate with landscape fabric), non-biodegradable (though easily removed and recycled upon repotting). Ensure caps are tight, or they might collapse under soil weight.
- Crushed Aluminum Cans:
- Pros: Lightweight, free, helps drainage, recycles waste.
- Cons: Crush them well to avoid water pooling inside.
- Packing Peanuts/Styrofoam Blocks: (Use non-biodegradable types – test by running under water).
- Pros: Extremely lightweight, good for drainage. Contain them in a mesh bag or old potting soil bag for easier removal later.
- Cons: Can shift or compress, non-biodegradable (environmental concern if not contained/reused), can be messy if loose. Avoid cornstarch-based peanuts that dissolve.
- Upside-Down Nursery Pots: (Clean plastic large flower pot plants come in).
- Pros: Creates a stable platform, uses readily available items, lightweight.
- Cons: Can leave large voids that require smaller fillers around them.
- Natural Materials (Wood Chips, Bark, Pine Cones, Sticks):
- Pros: Organic, lightweight, improve drainage initially.
- Cons: Decompose over time, causing soil level to sink (best for annuals you repot yearly). Can attract pests. May alter soil pH slightly as they break down.
- Coconut Coir Chunks/Fibers:
- Pros: Sustainable, lightweight, improves aeration and moisture retention (when mixed higher up).
- Cons: Decomposes over time, potentially holding too much moisture at the very bottom for some plants.
Heavier Filler Options (Use Sparingly or for Stability):
- Gravel/Pebbles/Broken Pottery:
- Pros: Excellent drainage, adds stability to prevent tipping in windy locations. Reuses broken items.
- Cons: Adds significant weight, making large flower pot hard to move. Contrary to old gardening myths, a layer of gravel doesn’t necessarily improve drainage within the soil layer itself; it can actually cause water to perch above it. Its main benefits here are taking up space and adding weight if needed.
- Bricks/Cinder Blocks:
- Pros: Provide substantial stability for very large, permanent planters.
- Cons: Very heavy, retain heat, difficult to remove.
Recommendation: For most situations where you want to reduce weight and cost, lightweight, non-biodegradable fillers like capped plastic bottles or contained packing peanuts offer the best balance. If stability is paramount and moving the pot isn’t planned, heavier options can be considered.
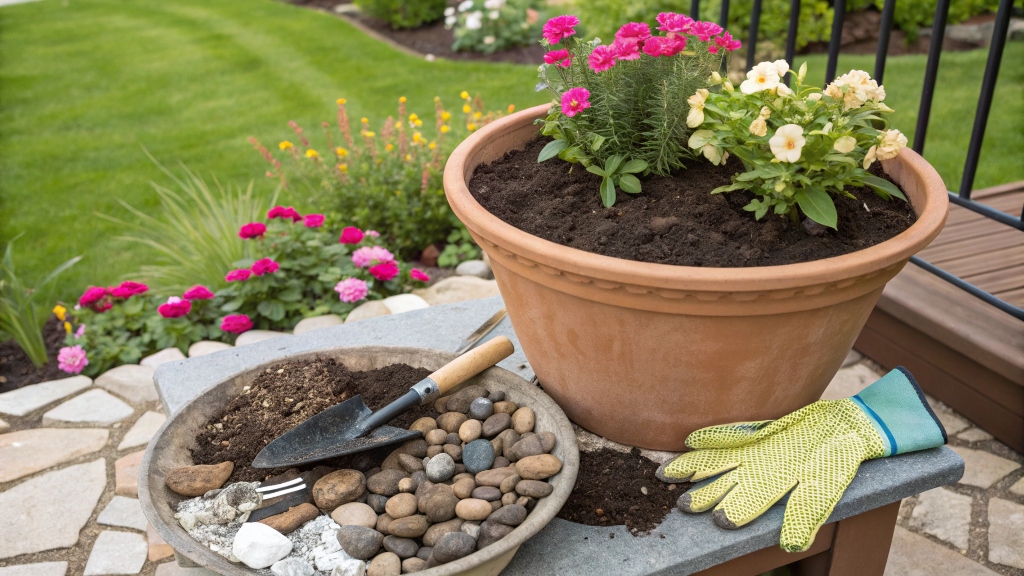
Barrier Protection: The Landscape Fabric Layer
Once you’ve added your chosen filler material, it’s highly recommended (though optional) to place a layer of permeable landscape fabric or screen mesh over the filler before adding soil. This simple step prevents the potting mix from washing down into the filler gaps, maintaining soil structure and making future repotting much cleaner. It allows water to drain through but keeps the soil separate. Cut a piece large enough to cover the filler and extend slightly up the pot sides.
Selecting the Right Soil Mix: Fuel for Your Plants
Do not use garden soil or topsoil directly from your yard in containers! It compacts easily, hindering drainage and aeration crucial for root health. It can also introduce pests, diseases, and weed seeds.
Always opt for a high-quality potting mix (often labelled “soilless mix”). These are specifically formulated for containers, providing a balance of:
- Moisture Retention: Often contains peat moss or coconut coir.
- Aeration/Drainage: Includes components like perlite (small white volcanic puffs), vermiculite, or pine bark fines.
- Nutrient Holding Capacity: Compost or aged forest products might be included.
Look for mixes designed for container gardening. Some may have a “starter charge” of fertilizer, but you’ll still need to implement a regular feeding schedule as nutrients leach out with watering. For very large pots, choose a mix that is relatively lightweight yet holds moisture well.
Step-by-Step: Filling Your Large Pot
Ready to assemble? Here’s the process:
- Prepare the Pot: Ensure it’s clean and the drainage holes are clear. If needed, place a piece of screen or a large pebble over (not plugging) the hole to prevent soil loss, although fillers often make this unnecessary.
- Add Filler: Fill the bottom 1/3 to 1/2 of the pot with your chosen lightweight filler material (e.g., capped water bottles, bagged packing peanuts). Adjust depth based on plant root needs.
- Place Barrier (Recommended): Lay landscape fabric over the filler layer, tucking it slightly up the sides.
- Add Potting Mix: Pour in high-quality potting mix over the fabric, filling until you reach the desired depth for planting. Leave enough space (headspace) between the soil surface and the pot rim (1-2 inches for large pots) to allow for watering without overflow.
- Arrange Plants: Gently remove plants from nursery pots, loosen any tightly bound roots, and arrange them according to your design (see “Thriller, Filler, Spiller” below).
- Fill Gaps: Add more potting mix around the plants, gently firming it to remove large air pockets, ensuring the base of the plants sits at the same level as they were in their nursery large flower pot. Don’t compact the soil too much.
- Water Thoroughly: Water slowly and deeply until water runs freely from the drainage holes. This settles the soil around the roots. You may need to top up with a little more mix after the initial watering settles things.
The “Thriller, Filler, Spiller” Planting Technique
A classic design principle for creating visually appealing containers:
- Thriller: A tall, eye-catching plant in the center or back (e.g., ornamental grass, canna lily, upright fuchsia, dracaena spike).
- Filler: Mounding plants surrounding the thriller to fill space (e.g., petunias, geraniums, coleus, begonias).
- Spiller: Trailing plants placed near the edge to cascade over the sides (e.g., sweet potato vine, lobelia, calibrachoa, ivy).
Remember to choose plants with similar light (sun/shade) and water requirements.
Watering and Maintenance for Large Pots
While large pots hold more soil and dry out slower than small ones, they still need consistent watering, especially during hot, windy weather.
- Check Moisture: Don’t rely on a schedule. Check the top 1-2 inches of soil; if it’s dry, it’s time to water.
- Water Deeply: Water thoroughly until water drains from the bottom. This encourages deep root growth.
- Fertilize Regularly: Plants in containers rely entirely on you for nutrients. Use a balanced liquid fertilizer every 2-4 weeks during the growing season, or incorporate a slow-release fertilizer into the potting mix at planting time, following package directions.
- Mulch (Optional): A thin layer of mulch (wood chips, cocoa hulls) on the soil surface can help retain moisture and suppress weeds.
Common Mistakes to Avoid
- No Drainage Holes: The #1 killer of container plants. Always ensure drainage.
- Using Garden Soil: Leads to compaction, poor drainage, and potential diseases. Stick to potting mix.
- Skipping Fillers (Unless Necessary): Results in overly heavy, expensive pots.
- Overpacking Plants: Give roots space to grow. Follow plant spacing guidelines.
- Inconsistent Watering: Both overwatering and underwatering stress plants. Check soil moisture regularly.
- Forgetting Fertilizer: Container plants deplete nutrients quickly. Feed them!
- Ignoring Plant Needs: Pairing sun-lovers with shade-dwellers or drought-tolerant plants with thirsty ones spells trouble.
Read More Also: Why Does My Pillow Feel Damp in the Morning? Top Reasons and Simple Fixes
People Also Ask (FAQs)
Q1: What can I put in the bottom of my large planters to make them lighter?
A: Excellent lightweight fillers include empty, tightly capped plastic water/soda bottles, milk jugs (rinsed), crushed aluminum cans, non-dissolvable packing peanuts (contained in a bag), upside-down plastic nursery pots, or natural materials like pine cones or wood chips (though these decompose).
Q2: Do I really need to put rocks in the bottom of my planters for drainage?
A: It’s a persistent myth! A layer of gravel doesn’t significantly improve drainage within the soil layer and can actually impede it by creating a perched water table. Its main function is to take up space or add weight for stability if needed. Good potting mix and drainage holes are key. Fillers like plastic bottles provide drainage channels without the weight of rocks.
Q3: How much soil do I need for a large planter?
A: It depends on the large flower pot. Research the root depth needed for your chosen plants. Most annuals need 6-12 inches of soil depth. Larger shrubs or vegetables like tomatoes may need 18 inches or more. Fill the bottom portion below that required depth with your chosen filler material.
Q4: Should I put landscape fabric over the filler in my large pot?
A: Yes, it’s highly recommended. A layer of permeable landscape fabric or screen mesh between the filler and the potting mix prevents soil from washing down into the filler, keeps the drainage paths open, and makes future repotting much easier and cleaner.
Q5: Can I reuse potting soil in my large containers?
A: It’s generally best to start with fresh potting mix each year, especially for annuals and vegetables, as the old mix becomes depleted of nutrients and its structure can break down. If the previous year’s plants were disease-free, you can sometimes amend and reuse a portion by mixing it with fresh mix and compost, but ensure good structure and add fresh fertilizer.
Read More Also: Negotiating Unexpected Medical Bill Reduction Tactics: A Comprehensive Guide
Conclusion: Embrace the Grandeur!
Filling large flower pot doesn’t have to be a daunting or costly task. By understanding the principles of weight reduction, drainage, and proper soil selection, and by utilising readily available filler materials, you can create magnificent container displays with ease. Using fillers like plastic bottles or packing peanuts saves money, makes pots more manageable, and contributes to good drainage. Paired with the right potting mix and consistent care, your large planters will become stunning focal points, brimming with healthy, vibrant life season after season. Happy planting!