
Picture this: You’re rushing to work on a Monday morning when your garage door suddenly groans like an old ship in a storm. The culprit? Those small but mighty components called rollers. Learning to inspect and replace garage door rollers for safe, smooth movement isn’t just about convenience – it’s about protecting your family and your investment. With the average garage door opening and closing approximately 1,500 times each year, these hardworking components deserve more attention than they typically receive. This comprehensive guide will transform you from a garage door novice into a confident maintenance expert, ensuring your door operates safely and quietly for years to come.
Understanding the Critical Role of Garage Door Rollers in Daily Operations
Your garage door weighs between 125 to 350 pounds, yet it glides up and down effortlessly thanks to a system of rollers working in perfect harmony. These small wheels, typically measuring 2-3 inches in diameter, bear the entire weight of your door while guiding it along metal tracks. However, their importance extends far beyond simple movement.
Rollers serve as the primary interface between your door and its track system. They distribute the door’s weight evenly, preventing stress concentration that could damage tracks or panels. Quality rollers also dampen vibration and reduce noise, making your garage door operation nearly silent. Moreover, they maintain proper door alignment, preventing costly misalignment issues that could compromise your door’s structural integrity.
When rollers begin to fail, the effects cascade throughout the entire system. Cracks, chipping, loose parts, loose seals, and missing parts indicate it is time to call a technician for garage door replacement. Understanding this interconnected relationship helps homeowners appreciate why roller maintenance deserves priority attention in their home care routine.
Recognizing the Warning Signs That Demand Immediate Roller Attention
Successful roller maintenance begins with knowing what to look for during regular inspections. Your garage door communicates its needs through various symptoms, and learning this language can save you from expensive repairs and potential safety hazards.
Visual indicators provide the most obvious clues about roller condition. Steel rollers typically show bending over time, while nylon versions may display cracking or chipping patterns. Steel rollers tend to bend over time, while nylon ones may show cracking or chipping. Additionally, examine the roller shafts for dents, kinks, or excessive wear patterns that could indicate alignment problems.
Auditory signals often precede visible damage. Squeaking, grinding, or unusual rattling sounds during door operation suggest roller problems. These noises intensify over time as damaged rollers struggle to perform their function. Furthermore, pay attention to operational changes – jerky movement, slower opening speeds, or doors that appear crooked during operation all point to roller issues requiring immediate attention.
Key Warning Signs Checklist: • Visible cracks or chips in roller material • Bent or damaged roller shafts • Excessive noise during door operation • Jerky or uneven door movement • Doors that appear misaligned or crooked • Debris buildup around roller areas
Essential Tools and Safety Equipment for Professional-Grade Roller Maintenance
Before beginning any roller inspection or replacement work, assembling the right tools ensures both safety and efficiency. Professional-grade maintenance requires more than basic household tools, and investing in quality equipment pays dividends in results and personal safety.
Your essential tool kit should include adjustable wrenches, socket sets, and vice-grip pliers for removing and installing rollers. Additionally, gather a sturdy stepladder, work gloves, and safety glasses to protect yourself during the process. A flashlight or headlamp proves invaluable for inspecting dark track areas, while a digital camera helps document roller positions before removal.
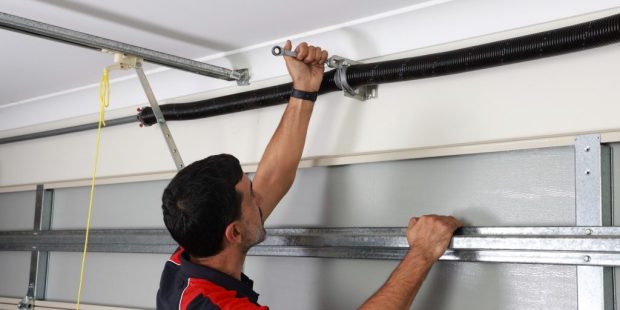
Safety equipment deserves special emphasis given the potential dangers involved in garage door work. Over 1,600 injuries occur during garage door repair and maintenance, making proper precautions essential. Always ensure the door remains properly supported during roller replacement, and never attempt to work on spring-loaded components without professional assistance. Remember, garage doors under tension can cause serious injury if mishandled.
Complete Tool List: • Adjustable wrenches (multiple sizes) • Socket set with ratchet • Vice-grip pliers • Sturdy stepladder • Work gloves and safety glasses • Flashlight or headlamp • Digital camera for documentation
Step-by-Step Roller Inspection Process That Professionals Use
Conducting thorough roller inspections requires systematic approach and attention to detail. Professional technicians follow established protocols that ensure no potential problems escape notice, and homeowners can adopt these same methods for comprehensive assessments.
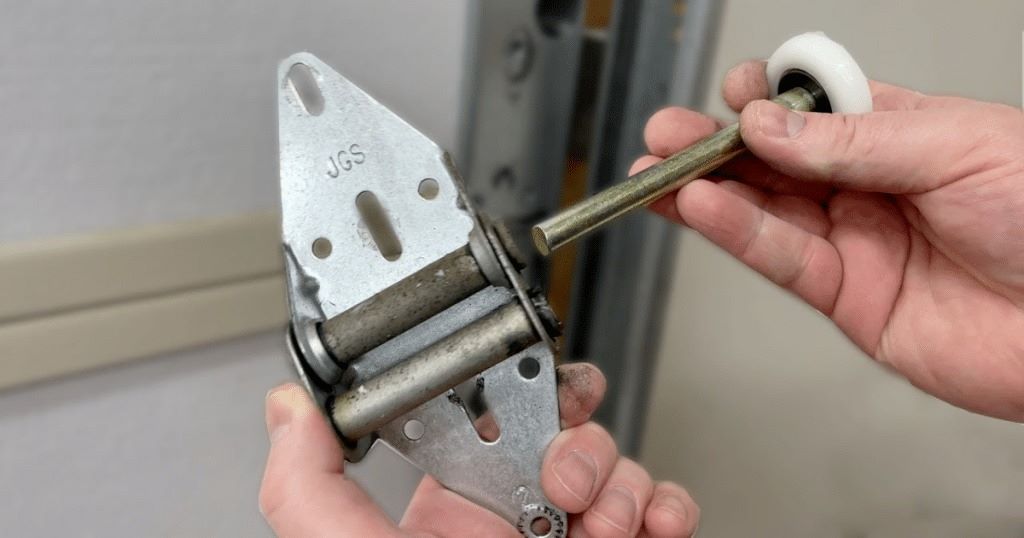
Begin your inspection with the door in the closed position, examining the bottom rollers first. These components typically show wear fastest due to bearing the door’s full weight. Check for smooth rotation by manually spinning each roller – they should turn freely without binding or resistance. Dirt, dust, and debris can build up on the rollers over time, affecting their performance, so clean away any accumulation using a damp cloth before testing.
Progress upward along the track system, inspecting each roller individually. Look for proper seating within the track – rollers should ride centered without touching track edges. Document any irregularities with photos, noting their specific locations for reference during replacement. Pay particular attention to the top rollers, which often reveal alignment issues through unusual wear patterns or positioning anomalies.
Professional Inspection Sequence:
- Start with door closed, examine bottom rollers
- Test manual rotation for smooth operation
- Clean away debris and buildup
- Progress upward, checking each roller individually
- Verify proper track seating and alignment
- Document issues with photos and notes
Common Roller Problems and Their Underlying Causes Explained
Understanding why rollers fail helps homeowners prevent future problems and make informed maintenance decisions. Most roller issues stem from predictable causes that regular maintenance can address before they become serious problems.
Wear and tear represents the most common cause of roller failure. Normal operation gradually wears roller bearings and materials, especially in doors that cycle frequently. Environmental factors accelerate this process – moisture promotes rust in steel components, while temperature fluctuations cause expansion and contraction that stresses roller materials. Additionally, lack of lubrication allows metal components to grind against each other, creating premature wear.
Improper installation or adjustment creates another category of problems. Misaligned tracks force rollers to operate at incorrect angles, causing uneven wear and potential binding. Over-tightened roller brackets can prevent proper rotation, while loose fittings allow excessive play that damages both rollers and tracks. Furthermore, using incorrect roller sizes or types for specific door weights leads to premature failure and potential safety hazards.
Primary Failure Causes: • Normal wear from frequent operation cycles • Environmental damage (moisture, temperature changes) • Inadequate lubrication maintenance • Track misalignment issues • Improper installation or adjustment • Using incorrect roller specifications
Safety Precautions That Could Save Your Life During Replacement
Garage door roller replacement involves significant safety risks that demand serious attention and proper precautions. Understanding these dangers and implementing appropriate safeguards protects both novice and experienced homeowners from potentially severe injuries.
The primary danger comes from the door’s weight and spring tension system. Garage doors typically weigh 150-400 pounds and rely on high-tension springs for counterbalance. Again, please note that it can be very dangerous to attempt to replace your garage door’s cables yourself, and similar cautions apply to roller work near spring systems. Never attempt to adjust or remove springs without professional assistance, and always ensure the door remains properly supported during roller replacement.
Additional safety measures include disconnecting the automatic opener before beginning work, preventing accidental door movement. Work with a partner whenever possible – having assistance available proves invaluable for both safety and efficiency. Moreover, avoid working alone on heavy doors or in awkward positions that could compromise your balance or control over the door’s movement.
Critical Safety Rules: • Disconnect automatic opener before starting • Never work alone on heavy doors • Avoid adjusting spring-loaded components • Ensure proper door support throughout process • Use appropriate personal protective equipment • Stop work if uncertain about any procedure
Choosing the Right Replacement Rollers for Your Specific Door Type
Selecting appropriate replacement rollers significantly impacts your door’s performance, longevity, and noise levels. Different roller materials and designs suit various applications, and making informed choices ensures optimal results from your maintenance investment.
Nylon rollers offer several advantages for residential applications. They operate quietly, resist corrosion, and require minimal maintenance once installed. However, they may not suit extremely heavy doors or high-cycle commercial applications. Steel rollers provide superior durability and load-bearing capacity but require regular lubrication and may produce more operational noise.
Ball-bearing versus sleeve-bearing design represents another important consideration. Ball-bearing rollers typically last longer and operate more smoothly but cost more initially. Then warranty on these upgraded rollers will vary by manufacturer, but typically from 2 years to lifetime again dependant on the type of roller and bearing design. Sleeve bearings offer lower initial cost but may require more frequent replacement, making total ownership costs comparable.
Roller Selection Guide: • Nylon: Quiet operation, low maintenance, moderate durability • Steel: Maximum durability, requires lubrication, higher noise • Ball-bearing: Longer life, smoother operation, higher cost • Sleeve-bearing: Lower initial cost, more frequent replacement needed
Professional Installation Techniques for Perfect Roller Replacement
Proper installation techniques ensure your new rollers perform optimally and last their intended lifespan. Following professional methods prevents common installation errors that could compromise door operation or safety.
Begin replacement with the door properly supported and the opener disconnected. Remove old rollers one at a time, starting with the least critical positions to maintain door stability. Clean the track thoroughly before installing new components, removing any debris or old lubricant buildup. Ensure that the roller is spinning freely and keep in mind that regular lubrication methods should also be employed in order to prevent premature wear and tear.
Install new rollers by carefully positioning them in the track and securing mounting brackets to manufacturer specifications. Avoid over-tightening, which can prevent proper roller rotation, but ensure connections remain secure under operational loads. Test each roller’s movement before proceeding to the next position, verifying smooth operation and proper track alignment throughout the installation process.
Installation Best Practices:
- Support door properly before beginning
- Replace rollers one at a time for stability
- Clean tracks thoroughly before installation
- Position rollers carefully in track channels
- Tighten brackets to specification (avoid over-tightening)
- Test operation before proceeding to next roller
Maintenance Schedule That Prevents Future Roller Problems
Establishing a regular maintenance routine prevents most roller problems and extends component life significantly. Rollers should be inspected at least once per year and recommended lubrication about every 3-4 months or twice a year at minimum. Following this schedule catches developing issues before they become expensive problems.
Monthly visual inspections take only minutes but provide early warning of developing issues. Look for obvious damage, listen for unusual sounds, and observe door operation for changes in smoothness or alignment. These quick checks help identify problems while they remain easily correctable rather than waiting for complete component failure.
Quarterly maintenance should include thorough cleaning and lubrication of all roller components. Remove debris buildup, apply appropriate lubricants to bearing points, and verify proper track alignment. Additionally, document your observations in a maintenance log, creating a history that helps identify patterns or recurring issues requiring professional attention.
Maintenance Timeline: • Monthly: Visual inspection and operational test • Quarterly: Deep cleaning and lubrication service • Annually: Comprehensive professional inspection • As needed: Address identified issues promptly
Cost Analysis: DIY Versus Professional Roller Replacement Services
Understanding the financial implications of DIY versus professional roller replacement helps homeowners make informed decisions about their maintenance approach. While DIY work offers potential savings, professional services provide expertise and warranties that may justify their cost.
DIY replacement costs primarily involve roller purchase prices, which range from $15-50 per roller depending on material and quality. Basic nylon rollers cost less initially but may require more frequent replacement. Premium ball-bearing rollers command higher prices but often include extended warranties and longer service life. Additionally, factor in tool costs if you don’t own appropriate equipment.
Professional installation typically costs $200-500 for complete roller replacement, including parts and labor. This investment includes expert diagnosis of underlying problems, proper installation techniques, and service warranties that protect your investment. Typically, standard rollers may need replacing every few years. High-quality rollers, like those made from nylon with sealed bearings, may justify professional installation through their extended service life.
Cost Comparison Factors: • DIY: $60-200 (materials only) • Professional: $200-500 (parts and labor) • Consider: Tool costs, time investment, warranty coverage • Factor: Risk of improper installation consequences
Troubleshooting Guide for Common Post-Installation Issues
Even carefully executed roller replacements can encounter problems during initial operation. Understanding common issues and their solutions helps homeowners address minor problems without requiring professional intervention.
Binding or sticking during operation often indicates alignment problems or over-tightened mounting hardware. Check that rollers sit properly centered in their tracks without touching sides or binding against track lips. Slightly loosening mounting brackets may resolve rotation problems, but avoid creating excessive play that could damage components over time.
Increased noise levels following roller replacement may result from inadequate lubrication or installation errors. Apply appropriate lubricants to all moving parts, ensuring even distribution without over-application that could attract debris. Additionally, verify that all mounting hardware remains properly tightened and that rollers maintain proper track alignment throughout their full range of motion.
Common Problem Solutions: • Binding: Check alignment, loosen over-tight brackets • Noise: Apply proper lubrication, verify mounting tightness • Uneven operation: Inspect track alignment, adjust as needed • Premature wear: Review maintenance schedule, upgrade lubricants
When to Call Professionals Instead of Attempting DIY Repairs
Recognizing the limits of DIY capability protects both personal safety and your garage door investment. Certain situations require professional expertise and specialized equipment that homeowners shouldn’t attempt to provide independently.
Spring-related issues represent the most dangerous category requiring professional attention. Garage door springs store tremendous energy and can cause serious injury if mishandled. Similarly, structural problems involving track alignment or door balance exceed typical homeowner capabilities and may create safety hazards if addressed improperly. Beyond these DIY maintenance tasks, it’s crucial to schedule a professional servicing of your roller door at least once every one to two years.
Complex diagnostic problems also warrant professional evaluation. When roller replacement fails to resolve operational issues, underlying problems may involve opener adjustments, structural damage, or component incompatibilities requiring expert diagnosis. Additionally, warranty considerations may mandate professional installation for coverage validity, making DIY work financially counterproductive despite initial cost savings.
Professional Service Indicators: • Spring tension or adjustment issues • Structural damage or misalignment • Complex diagnostic requirements • Warranty coverage requirements • Safety concerns beyond comfort level • Repeated DIY repair failures
Conclusion: Mastering Roller Maintenance for Long-Term Garage Door Success
Learning to inspect and replace garage door rollers for safe, smooth movement empowers homeowners to maintain one of their home’s most important mechanical systems. Through regular inspections, proper maintenance schedules, and informed replacement decisions, you can ensure your garage door operates safely and efficiently for years to come. Remember that while many roller maintenance tasks suit DIY approaches, never hesitate to consult professionals when safety concerns arise or problems exceed your comfort level.
The investment in proper roller maintenance pays dividends through extended door life, reduced repair costs, and enhanced family safety. Start implementing these maintenance practices today, and your garage door will reward you with reliable, quiet operation that adds value and convenience to your daily routine.
Share your garage door maintenance experiences in the comments below, or pass this guide along to neighbors who might benefit from these professional insights!
Frequently Asked Questions
Q: How often should garage door rollers be replaced? A: Standard rollers typically need replacement every 5-7 years with normal use, while high-quality nylon or ball-bearing rollers may last 10-15 years with proper maintenance.
Q: Can I replace just one damaged roller? A: While possible, replacing rollers in sets ensures even wear patterns and consistent door operation. Mixed roller ages can create alignment issues.
Q: What’s the difference between steel and nylon rollers? A: Steel rollers offer superior durability and load capacity but require regular lubrication. Nylon rollers operate quieter and need less maintenance but may not suit heavy doors.
Q: Is it safe to replace garage door rollers myself? A: Basic roller replacement is generally safe for experienced DIYers, but avoid working near springs or tension cables. When in doubt, consult professionals.
Q: How do I know if my tracks need adjustment after roller replacement? A: Properly installed rollers should operate smoothly without binding or noise. Persistent problems after roller replacement may indicate track alignment issues requiring professional attention.
Read more: